
Editing using Audacity Workshop:
Overall whilst this was very challenging, I was happy with the outcome!
Before:
After:
In this Workshop we had been given the sound affects we had to edit to make them sound realistic. For example when I started with the thunder it sounded more like a bomb. However, once I had begun editing it started to sound more like the desired effect. I chose to lower the pitch and drag out the tempo whilst cutting the unwanted sound. Eventually it began to sound like how I wanted it to sound. For me this was a fairly difficult workshop as I am not used to playing around and editing tracks and sound affects. However after finishing the workshop I feel far more confident using audacity than I did before. If and when I am to do this again, I would like to explore editing the length of the tracks further and also fiddle around with being able to repeat certain parts of the tracks and move things about. This entire task was difficult and challenging for me as it was outside of my comfort zone, However I enjoyed being able to explore this side of thing.
Rigging a light Workshop:
In this workshop I was shown how to rig and de-rig a light. I then had to rig the light myself. In this workshop I was shown how to safely open and set up the ladder to then rig the light. To do this I needed to carry the light safely up the ladder whilst maintaining three points of contact at all time; for me this was two feet and an arm. when I reached the top of the ladder I had to first of all hook the light over the silver bar railings then I needed to secure the clamp. I found this difficult as I wasn't turning it the right way, however I soon got the hang of it. Once the clamp was secure I needed to attach the security ring, this is a back up for if the clamp on the light fails. to do this I needed to make sure the chain ring was around both the light and the rail before tightening the chain. After this the final step was plugging the light in. I messed up here as I was supposed to hook it over the bar so I didn't hang, instead I let it hang. This is a safety hazard as I could have caught my neck as I came down, fortunately I didn't. This was a hard workshop for me as I was working from a height, however I overcome the idea and was able to complete the task at hand. Whilst I enjoyed the challenge to an extent, I don't think that I will be jumping to volunteer to do this again!
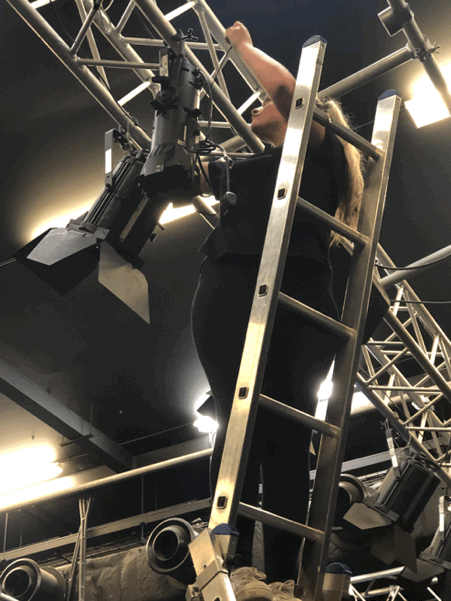
I really enjoyed this challenge as it was very different to what I would normally do!
Making an apron workshop:
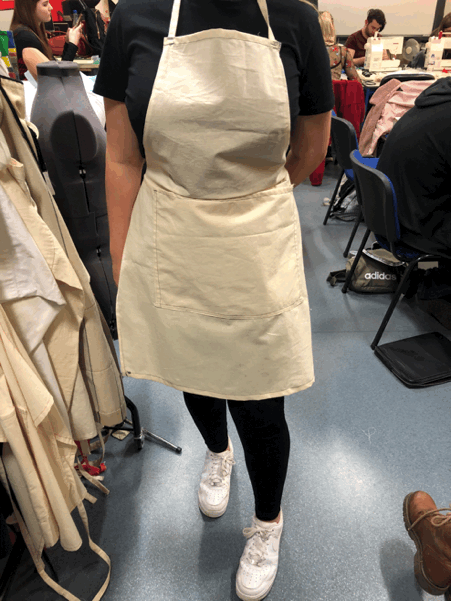
In this workshop I was required to create an apron using my own designs and the use of a sewing machine. I used a number of stitches including a running stitch, a zig zag stitch and a hem stitch. I first had to create my design then I could begin cutting material. Once I was ready to begin I started by hemming the entire apron. After I was able to attach the pocket and then the strings to tie it around my neck and back. I found this workshop challenging but enjoyable and am happy with my end result. I would love to be able to explore more sewing techniques in the future. I have been lucky enough to complete the jean stitch and other techniques in practice with my nan. Which I am grateful for as it gave me some insight into a basic understanding.
I found this workshop both easy and theraputic!
Make-up workshop:


In the makeup workshop I used several methods to obtain several outcomes. For example; through the use of the colodian and stretch method I created a burn. However you o the opposite of this and actually pinch the skin together to create the scar look. When using he artex I had to work quickly as once it has been activated it will harden fairly quickly. Once it is set I was then able to add additional colour and blood. When it came to creating the bruise I needed to start with a base colour which is yellow. I then worked in some green, then blue purple and little bit of black then once it is all blended and everything is how you want it to be your all set. I was extremely happy with the outcome of all of these 'looks', I feel far more within my comfort zone when exploring different makeup techniques. I also really enjoy being able to complete some makeup ideas as it is my favourite part of the course.
Scar and burn using colodian


Artex work and bruise
I really LOVE working with special effects make-up so throuroly enjoyed this workshop!
Props workshop:
I was not so happy with the outcome of this workshop so would like to improve on my skills!
This was an interesting workshop for me, I really enjoyed the practical and messy element of making the prop, However was not particularly happy with the outcome. We started off with a list of props to explore we then each chose the one we would like to do and got straight on. I had selected the hot coals. Initially my plan was to make them all out of air dough clay, However after attempting this I realised it would have been a large waste of expensive resources. Therefore I opted for the paper Mache route. This was working initially but the developed some faults. To start I teared up several small pieces of newspaper to that I was ready to use them, I then added some PVA glue to water to dilute the mixture I would used. Finally I screwed up a piece of newspaper in the size ball I wanted then added some masking tape to keep it in place. I was then ready to start the paper Mache process. This was messy and whilst it started to work it then stopped, it was no longer sticking to anything. This is when I decided to swap tactics again. I chose to try Modroc as I thought it will be easier to smooth but will also give me small holes all over if I wanted to create the more coal like look. This worked, I was happy that it worked even if I was suddenly covered in a lot of white dust. Once I had covered all of the coals I let them set and harden. Up until now I was very happy with the way they was looking. Once I went back to look at them after they were dried, it wasn't the outcome I was hoping for. The holes that I thought would look coal like didn't and the whole thing looked a bit bizarre. However that being said I'm proud of how hard I worked but would certainly like try using Modroc again to make something else, in the hopes I can get the outcome I want.
